
Garment Quality Control Checklist for Production Checks

A checklist is useful only when every standard can be checked consistently. A garment quality control checklist records approved specifications and inspection criteria for materials, measurements, workmanship, labels, and packing, from pre-production through in-line and final inspection. It gives inspectors a shared method for identifying issues early and recording whether garments meet requirements.
Knowing what to inspect is only part of the job; the right tools make checks more consistent. This guide explains what to inspect at each production stage, including finishing, labels, and packing. It also shows how measuring tapes, color references, barcode scanners, cameras, and other practical equipment support clear, repeatable checks.
Table of Contents
What is a garment quality control checklist?
A garment quality control checklist is a document that sets out approved specifications and inspection criteria for apparel. It guides checks from incoming materials to final inspection and creates a consistent record of what passed, failed, or needs correction. Inspection is a visual or hands-on assessment against those criteria. Testing, by contrast, follows a defined procedure to measure a material or garment property, such as colorfastness.
Use the same garment quality control checklist at three production stages. Before production, verify fabric and accessories against approved details for identity, type, color, and condition, then confirm the sample and production readiness. During production, inspect the first sewn garments before work continues, checking stitch consistency, tension, alignment, and construction. Follow up with in-line checks to catch recurring issues as garments are assembled. Before shipment, inspect finished garments for measurements, labeling, appearance, and packing.
To check fit, sizing, and construction, lay each sampled garment flat and measure the specified points against the approved size specification. Compare the fit and seam construction with the approved sample, then record any variance by size and location. Using a consistent measurement reference makes results repeatable across inspection records.
Record the style, lot, size, inspection stage, sample identification, and specification version. These fields connect each finding to the correct production batch and standard.
Log each defect’s location, description, classification, and evidence, such as a photo. Specific records help production teams trace corrections and review repeat issues.
State the result as pass, fail, or corrective action required, then add inspector and supplier signatures. Signatures show who reviewed the findings and acknowledged the conclusion.
Classify defects as critical, major, or minor according to their effect on safety, use, or appearance. The acceptable defect count depends on the AQL level agreed between buyer and supplier. A signed report should capture unresolved findings and the agreed disposition, documenting the final decision rather than leaving it to assumption.
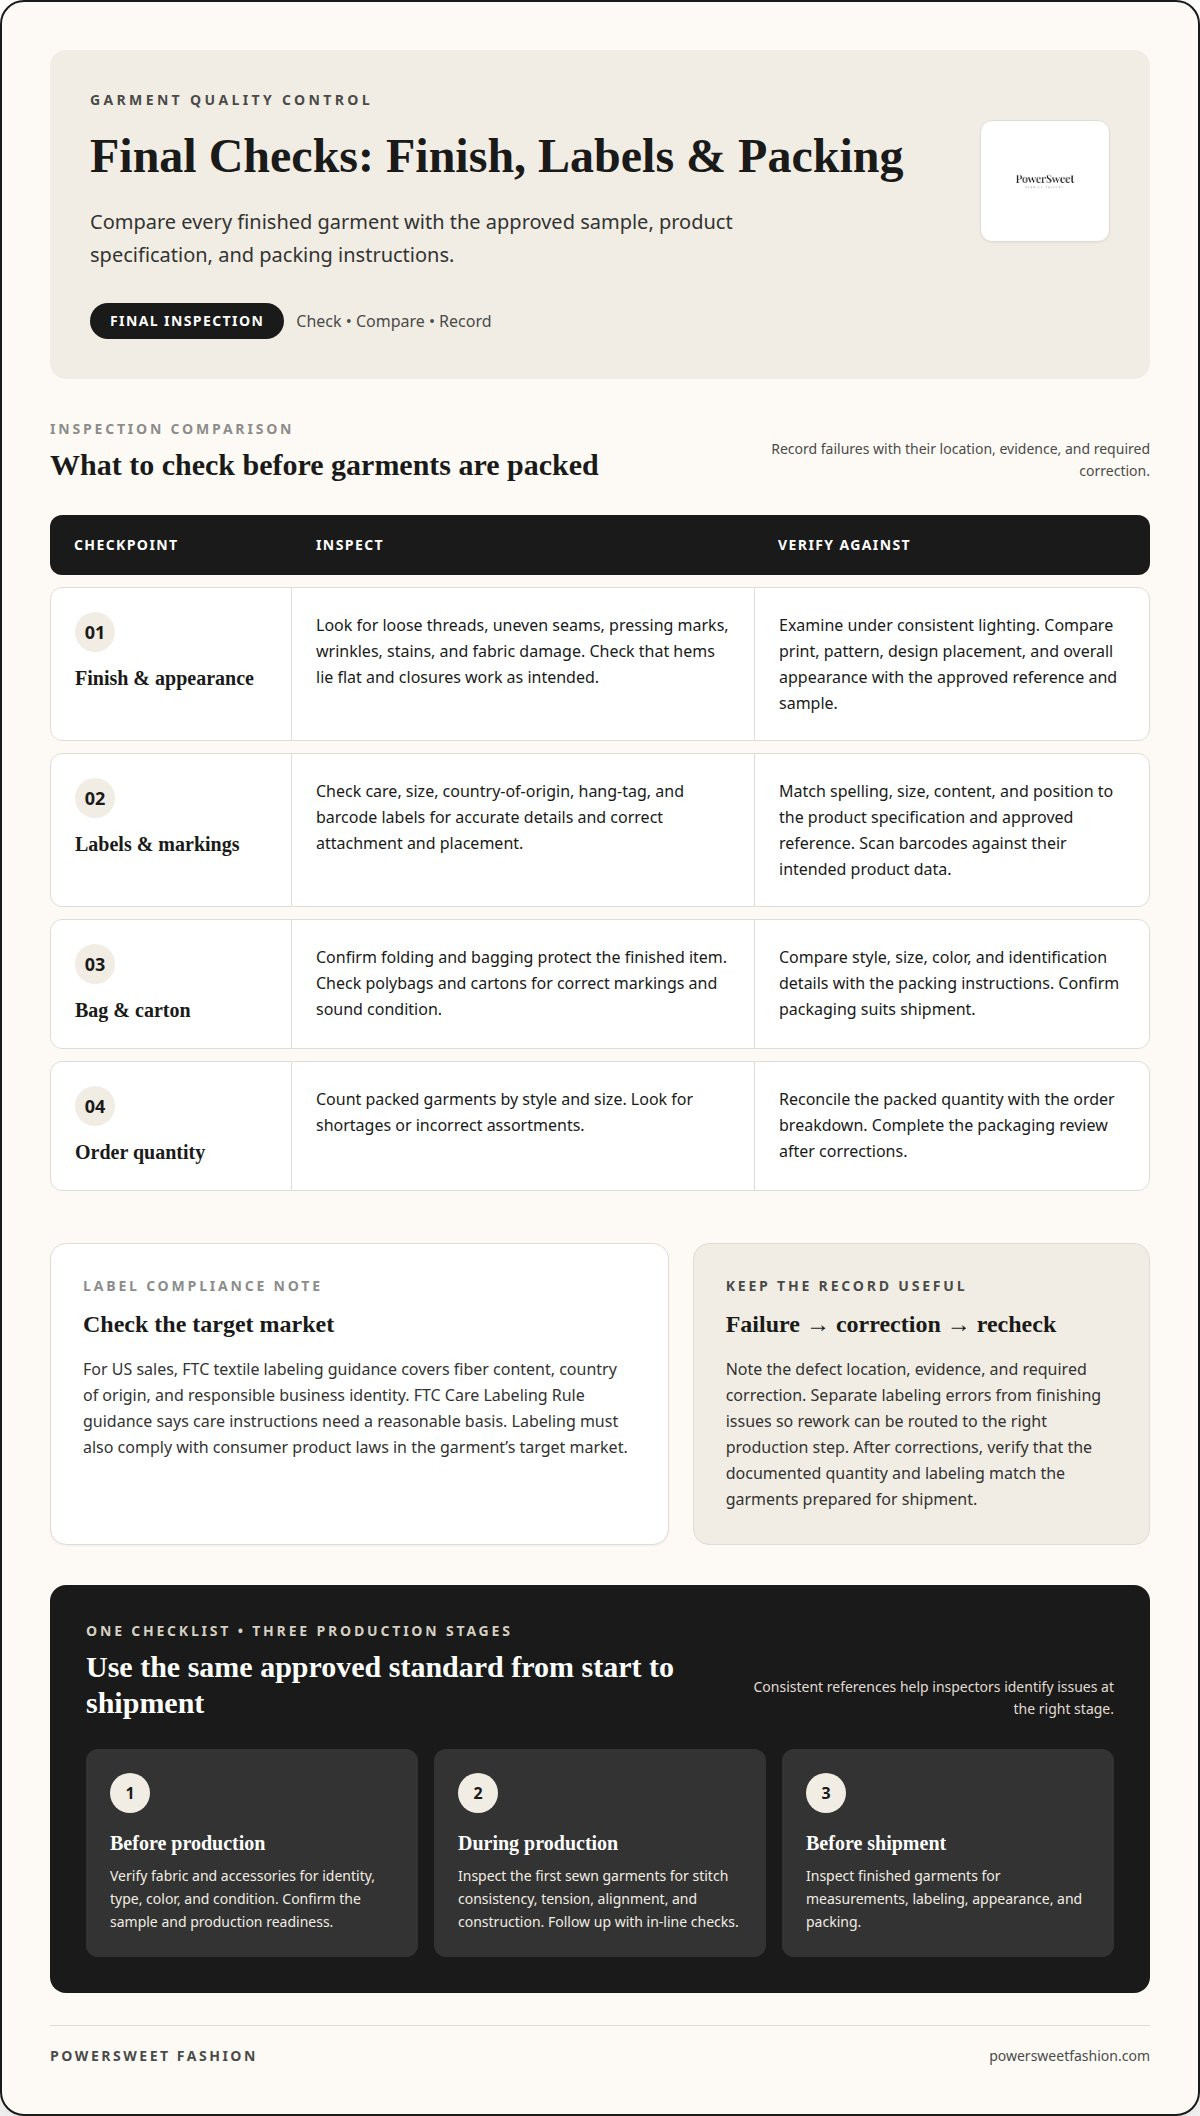
Finishing, garment labels, and packing
Finish each garment before checking its appearance under consistent lighting. Look for loose threads, uneven seams, pressing marks, wrinkles, stains, and fabric damage. Check that hems lie flat and closures work as intended. Compare print, pattern, and design placement with the approved reference, then record visible defects by location. The garment’s overall appearance should also match the approved sample.
Check every marking against the product specification and target market. Inspect care labels, size labels, country-of-origin labels, hang tags, and barcode labels for accurate details and placement. For US sales, FTC textile labeling guidance covers fiber content, country of origin, and responsible business identity. The FTC’s Care Labeling Rule guidance says care instructions need a reasonable basis. Labeling must also comply with consumer product laws in the garment’s target market.
Match each label to the approved reference. Check spelling, size, content, attachment, and position against the garment specification.
Scan barcodes against their intended product data. A barcode scanner can help reveal a mismatch before packaging.
Inspect each polybag and carton marking. Compare style, size, color, and identification details with the packing instructions.
Reconcile packed quantity with the order breakdown. Record counts by style and size to identify shortages or incorrect assortments.
Keep packaging checks connected to the actual garment. Confirm that folding and bagging protect the finished item, and check cartons for correct markings and sound condition. During final inspection, verify that labels are attached correctly and packaging suits shipment. If fabric identity or consistency is a recurring concern, fabric sourcing can help align material selection with the product specification from the start.
Record each failure with its location, evidence, and required correction. Distinguish an incorrect label from a finishing issue in the inspection record so the factory can route rework to the right production step. Complete the packaging review after corrections, ensuring the documented quantity and labeling reflect the garments actually prepared for shipment.
Quality control practices throughout production
Set product requirements before production begins. Record the approved fabric, color reference, construction details, measurements, and tolerances in one controlled specification. For example, define the permitted variation at each point of measure instead of relying on “close to sample.” This gives inspectors a clear basis for pass-or-fail decisions and helps the factory interpret requirements consistently.
Tie the approved sample and specification version to the production order. If fabric, trim, measurements, or construction details change, document the change, approval, and affected batches before work continues. Update the inspection criteria and share the new reference with production staff. Without a documented change, a correct garment may appear defective, or a genuine difference may go unnoticed.
AQL means acceptance quality limit. According to the International Organization for Standardization, ISO 2859-1 describes lot-by-lot sampling procedures indexed by an acceptance quality limit. Agree on the AQL and sampling plan with the supplier; use that plan to set the sample size and acceptable defect count. Classify findings as critical, major, or minor before applying the agreed limits.
There is no single test set for every clothing item. Choose checks based on garment type, materials, and intended use. Possible tests include colorfastness, shrinkage, tear resistance, and button or zipper strength. For clothing sold in the United States, account for safety regulations and standards relevant to the product and target market. Record each applicable requirement and test result.
Compare fabric texture, shade, and appearance with the approved reference. This helps identify material differences between batches.
Measure garments against the approved size specifications and tolerances. Record the point of measure and any variance.
Check prints, patterns, and design placement against the sample. Misalignment can change the finished garment’s intended appearance.
Log defects, corrective actions, and approvals by batch. These records show how planning changes affected inspection decisions.
Quality control tools and equipment
Tools make manufacturing checks repeatable when inspectors use them against consistent criteria. Match each instrument to a defined procedure and approved reference, then record the result. A measuring tape, ruler, fabric GSM scale, color reference standards, light box, barcode scanner, needle detector, and digital camera each help answer different quality questions.
Measure with a tape or ruler. Record garment dimensions at the specified points, using the same method across inspected samples.
Assess fabric weight with a GSM scale. Compare readings with the product specification to flag material variation.
Compare color with a reference standard. Pantone references and a light box support consistent shade assessments under controlled viewing conditions.
Check for metal contamination with a needle detector. Record the check result for the inspected garment or sample.
Scan barcodes and document defects. A barcode scanner checks label data, while a digital camera and defect stickers help identify findings for review.
Choose accessory tests according to the item’s function. For a pull test, apply 6± 0.2 kg of force for 10 seconds and record whether the attachment remains secure. For a fatigue test, repeat the accessory’s intended action at least 50 times; it passes when it remains undamaged. Buttons, zippers, and other trims need checks that reflect how they are used.
For elastic fabrics and straps, stretch the material and inspect for broken fibers or stitches. A pull gauge measures force during an accessory test. If one is unavailable, assess the accessory with a hand pull and record the method in the report. Note the tool, result, and any observed defect so later reviews can distinguish a measurement from a visual judgment.
Build tools into inspection procedures, not as a separate equipment list. Assign each tool to a checklist criterion, name who supplies it, and document the reference used. For support applying these checks during production, use garment quality control services.
PowerSweet Fashion: Custom Women's Clothing Production
PowerSweet Fashion supports fashion brands with custom women’s clothing production and practical quality checks. The team can help when you’re developing a new style, aligning materials with product requirements, or preparing inspection criteria for finished garments.
Sample Development turns design details into a sample for review before bulk production. Fabric Sourcing supports material selection, and Quality Control Services connect inspection criteria with production. Together, these services help bring specifications, materials, and garment checks into a clearer workflow.
If your next collection needs coordinated development and production support, contact PowerSweet Fashion to discuss your requirements.
Make quality checks part of every production decision
A checklist delivers value when teams use it as a working production tool, not a file set aside after approval. For your next style, assign responsibility for each check, keep approved criteria current, and use inspection findings to guide production decisions. This makes a garment quality control checklist a practical link between design intent and factory execution.
PowerSweet Fashion supports brands with Custom Women's Clothing Production, Sample Development, and Fabric Sourcing. If you’re preparing a new style or improving how quality requirements carry into production, these services can connect development with manufacturing.
Contact PowerSweet Fashion to discuss your production needs and take the next step with a clear plan.
Frequently Asked Questions
How are garment defects recorded?
Record each defect in enough detail for someone else to locate and assess it. Note the garment’s style and batch, identify the affected panel or seam, and describe the issue clearly, such as “puckering at left side seam.” Attach a photo with a reference point when useful. Track whether the finding is new or recurring, then document its disposition and closure status.
What should a garment quality control checklist include?
Include the style identifier, specification revision, inspection stage, criteria, result fields, and space to record corrective actions. Assign responsibility for each check, such as measuring garments or reviewing failed results. For a revised design, identify the approved sample and specification that apply. This helps inspectors avoid relying on outdated references after production instructions change.
How to inspect fabric quality before garment production?
Compare delivered fabric with the approved material reference before cutting. Check that its identity, color, texture, and weight match the specification, then inspect for visible holes, stains, or damage. Review roll identification and shade consistency so fabric from different lots can be distinguished. Record discrepancies before cutting, while affected material can still be isolated.
What are acceptable garment measurement tolerances?
Acceptable tolerances are the limits specified for each measurement in the approved product specification; no single figure suits every garment. A fitted dress and a relaxed top may use different points of measure and limits. Measure according to the defined method, record actual readings beside target measurements, and assess each size against its own approved specification.
How to check garment stitching, seams, and workmanship?
Turn the garment inside out and examine each seam from end to end. Look for skipped or broken stitches, loose thread ends, puckering, uneven seam allowances, and openings near seam starts or finishes. Compare seam placement and construction with the approved sample. Then inspect functional areas, including buttonholes and zipper attachment, to ensure they work without pulling the fabric out of alignment.
How to check labels, tags, packaging, and barcodes on garments?
Compare each garment’s care, size, and origin details with the approved labeling reference, then check tag placement and attachment. Scan the barcode and match the result to the style and size shown on the item. Compare polybag and carton markings with the packing breakdown. Reconcile packed assortments by size and color so a correct label on one item does not conceal a mixed carton.

Comments